> ## Documentation Index
> Fetch the complete documentation index at: https://codeplugtech.mintlify.site/llms.txt
> Use this file to discover all available pages before exploring further.
# Webhooks
Send parsed bank statement data in real-time to your desired endpoint.\
Automatically push extracted information to any application that supports Webhooks.
### Access Integrations
1. [Login](https://bankstmtconverter.com/login) to your **Bank Statement Converter** account.
2. Go to the **Dashboard**.
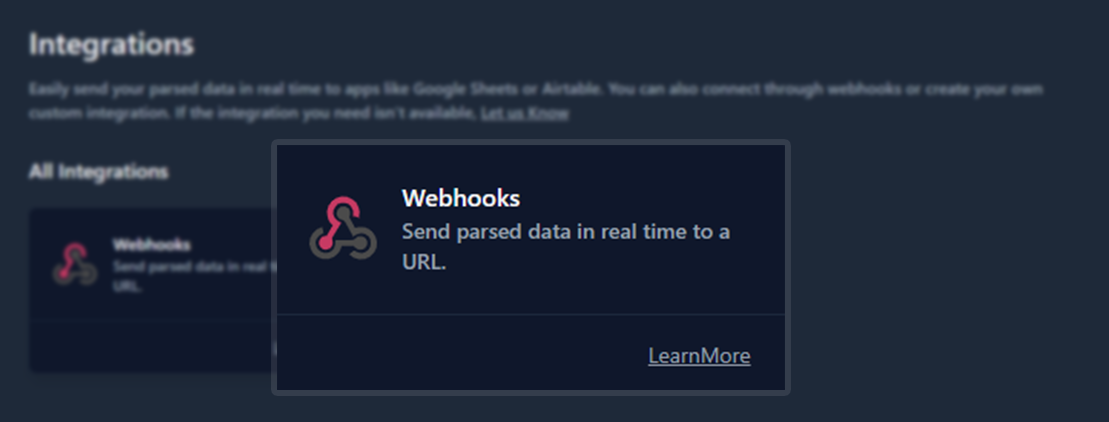
3. Click on **Integrations** → **Webhook**
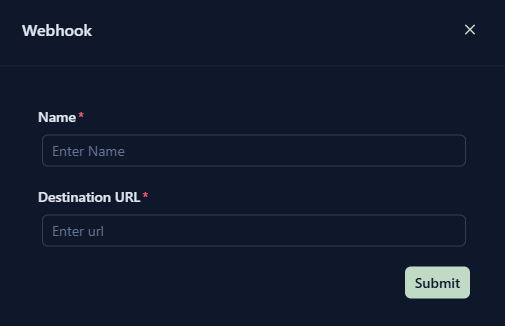
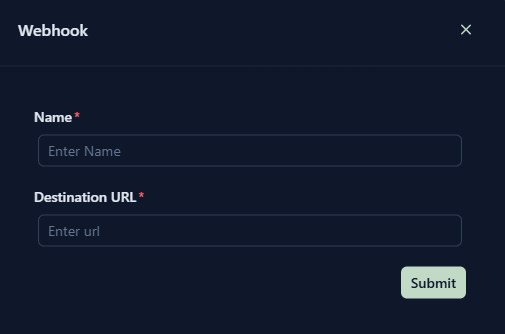
4. Enter the **Name** & **Destination URL** provided by the third-party app where you want to send data.
5. Click **Submit**
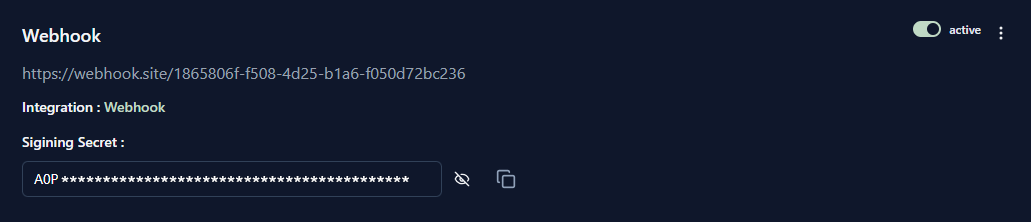
6. Ensure the Webhook is **active**. You may see a status indicator like "Active" or "Enabled".
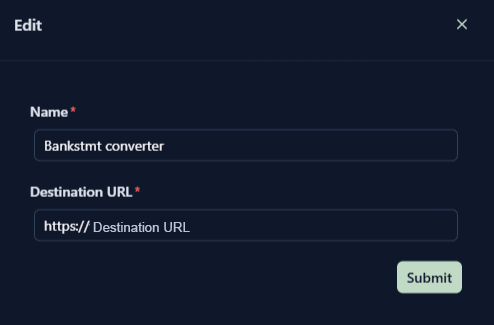
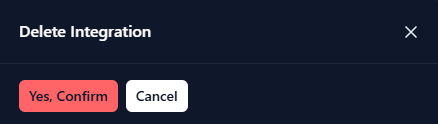
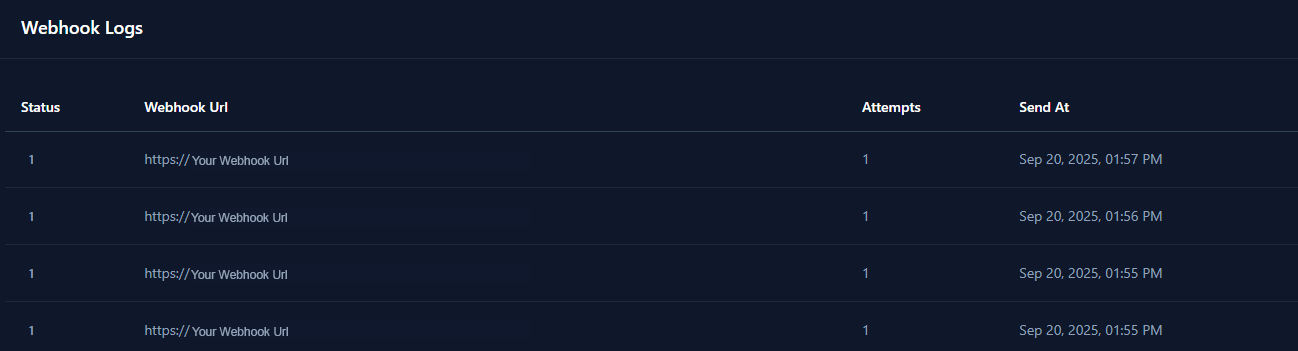
7. You can **edit**, **delete**, or **log** existing Webhooks anytime from the Webhooks page in Integrations.
8. Keep your Webhook URLs secure to prevent unauthorized access.
***
# Send Data to a Webhook
If you want to send your parsed data to your server, another app, or a platform that isn’t directly integrated with Google Sheets, or similar tools, the easiest way is to use a **webhook**. A webhook allows you to transfer data from one application to another in **real-time**, making it a more practical solution than traditional APIs.
## Steps to Export Your Parsed Data via Webhook
**Step 1:** Copy the endpoint URL from the application where you want to send the data.
**Step 2:** In your [Bank Statement Converter](https://bankstmtconverter.com/) account, go to **Integrations → Webhooks**.
**Step 3:** Click on **“Create a webhook”**, select a trigger (typically **“Document parsed”**), and paste the destination URL.\\
From this point onward, Bank Statement Converter will trigger the webhook every time the selected event occurs.
You can also use services like [webhook.site](https://webhook.site/) to generate a test webhook endpoint and view the received payload data in real-time.
## Configuring Your Server to Receive Payloads
If you want to receive Webhook events on your own server, you can use the following code samples to handle the payload data effectively.
#### PHP
```PHP theme={null}
$payload = @file_get_contents('php://input');
// ...
http_response_code(200);
```
#### go
```go theme={null}
package main
import (
"io/ioutil"
"net/http"
)
func main() {
http.HandleFunc("/webhook", func(w http.ResponseWriter, r *http.Request) {
// Read raw request body
payload, err := ioutil.ReadAll(r.Body)
if err != nil {
http.Error(w, "Failed to read body", http.StatusInternalServerError)
return
}
defer r.Body.Close()
// ... do something with payload
_ = payload // just like PHP comment placeholder
// Send 200 OK response
w.WriteHeader(http.StatusOK)
})
// Start server on port 4242
http.ListenAndServe(":4242", nil)
}
```
#### Python
```python theme={null}
from flask import Flask, jsonify, request
app = Flask(__name__)
@app.route('/webhook', methods=['POST'])
def webhook():
payload = request.data
# ...
return jsonify(success=True)
```
#### Node.js
```JavaScript theme={null}
const express = require('express');
const app = express();
app.post('/webhook', express.raw({type: 'application/json'}), (request, response) => {
const payload = request.body;
// ...
response.send();
});
app.listen(4242, () => console.log('Running on port 4242'));
```
# Secure Your Webhooks (Optional)
To receive Webhooks, you need a **publicly accessible URL** (the Webhook endpoint).
Be aware that this can be insecure, as anyone who knows the URL could trigger actions on your server.
BankStmtConverter provides a **unique Signing Secret** for each Webhook. Every Webhook payload is signed using this secret, and the signature is sent in the request header `BankStatementConverter-Signature`.
Verifying this signature ensures that the request is genuine and truly sent from BankStmtConverter.
## How to Verify the Signature
1. Use your **Signing Secret** to generate a signature for the received payload.
2. Compare your generated signature with the `BankStmtConverter-signature` header sent with the Webhook.
3. If both signatures match, the request is authentic and safe to process.
#### Steps to Verify the Signature
* Generate a hash of the entire received payload using the HMAC SHA-256 algorithm with your Signing Secret as the key.
* Convert this hash into Base64 format.
* Compare your generated signature with the value received in the BankStmtConverter-signature header.
* If both values match, the Webhook is verified.
***
# Webhook Event Fields
| Field Name | Value from your event | Meaning |
| -------------- | --------------------------------- | ------------------------------------------------------------------------------------------------------------------------------------------ |
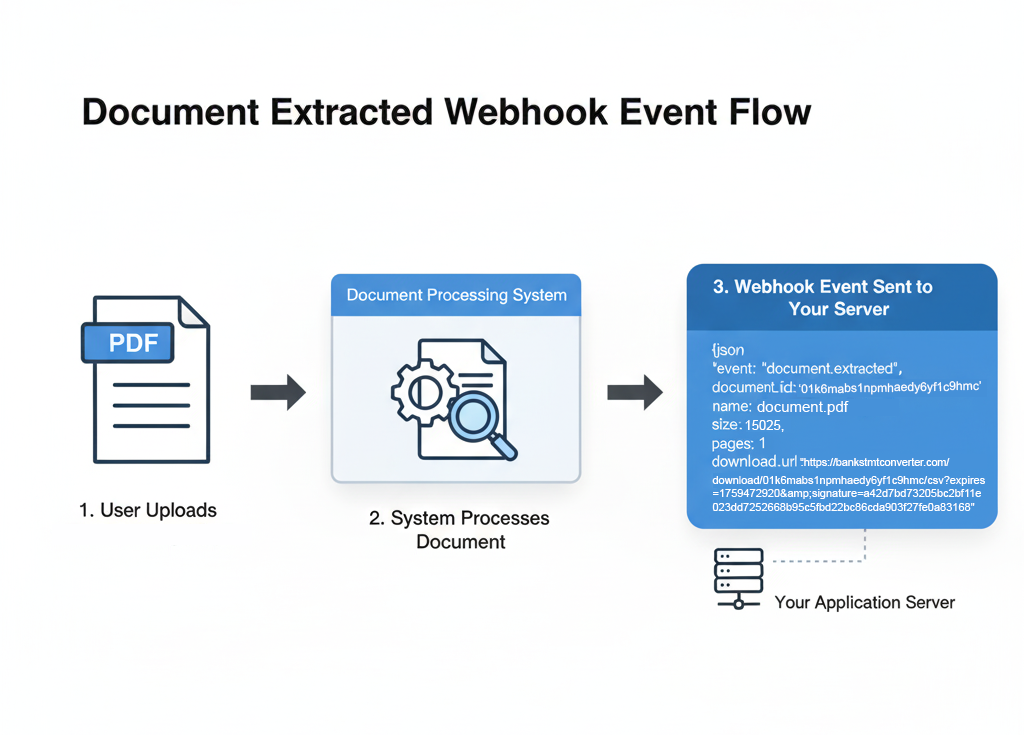
| `event` | `"document.extracted"` | The core action: The document has been successfully processed and its content/metadata is now available. This triggers your system to act. |
| `document_id` | `"01k6mabs1npmhaedyc9hmc"` | A unique identifier for this specific document. Use this ID to fetch the extracted data (text, tables, etc.). |
| `name` | `"Bankstmtconverter-Pricing.pdf"` | The original filename of the document. |
| `size` | `15025` | The size of the document in bytes. |
| `pages` | `1` | The number of pages in the document. |
| `download_url` | `(A URL)` | A temporary link to download the original document or possibly the extracted data (e.g., CSV/JSON file). |
***
## Reference
> Follow the screenshot above for a visual guide.
1. Enter the **Name** & **Destination URL** provided by the third-party app where you want to send data.
2. Ensure the Webhook is **active**. You may see a status indicator like "Active" or "Enabled".
3. In the options menu, you can **edit or delete** your **Name and Destination URL**.
4. Click Logs in the options menu to view your **Webhook Logs**.
> Follow the video for a step-by-step guide.
 **Step 3:** Click on **“Create a webhook”**, select a trigger (typically **“Document parsed”**), and paste the destination URL.\\
 From this point onward, Bank Statement Converter will trigger the webhook every time the selected event occurs.
You can also use services like [webhook.site](https://webhook.site/) to generate a test webhook endpoint and view the received payload data in real-time.
## Configuring Your Server to Receive Payloads
If you want to receive Webhook events on your own server, you can use the following code samples to handle the payload data effectively.
#### PHP
```PHP theme={null}
$payload = @file_get_contents('php://input');
// ...
http_response_code(200);
```
#### go
```go theme={null}
package main
import (
"io/ioutil"
"net/http"
)
func main() {
http.HandleFunc("/webhook", func(w http.ResponseWriter, r *http.Request) {
// Read raw request body
payload, err := ioutil.ReadAll(r.Body)
if err != nil {
http.Error(w, "Failed to read body", http.StatusInternalServerError)
return
}
defer r.Body.Close()
// ... do something with payload
_ = payload // just like PHP comment placeholder
// Send 200 OK response
w.WriteHeader(http.StatusOK)
})
// Start server on port 4242
http.ListenAndServe(":4242", nil)
}
```
#### Python
```python theme={null}
from flask import Flask, jsonify, request
app = Flask(__name__)
@app.route('/webhook', methods=['POST'])
def webhook():
payload = request.data
# ...
return jsonify(success=True)
```
#### Node.js
```JavaScript theme={null}
const express = require('express');
const app = express();
app.post('/webhook', express.raw({type: 'application/json'}), (request, response) => {
const payload = request.body;
// ...
response.send();
});
app.listen(4242, () => console.log('Running on port 4242'));
```
# Secure Your Webhooks (Optional)
To receive Webhooks, you need a **publicly accessible URL** (the Webhook endpoint).
Be aware that this can be insecure, as anyone who knows the URL could trigger actions on your server.
BankStmtConverter provides a **unique Signing Secret** for each Webhook. Every Webhook payload is signed using this secret, and the signature is sent in the request header `BankStatementConverter-Signature`.
Verifying this signature ensures that the request is genuine and truly sent from BankStmtConverter.
## How to Verify the Signature
1. Use your **Signing Secret** to generate a signature for the received payload.
2. Compare your generated signature with the `BankStmtConverter-signature` header sent with the Webhook.
3. If both signatures match, the request is authentic and safe to process.
From this point onward, Bank Statement Converter will trigger the webhook every time the selected event occurs.
You can also use services like [webhook.site](https://webhook.site/) to generate a test webhook endpoint and view the received payload data in real-time.
## Configuring Your Server to Receive Payloads
If you want to receive Webhook events on your own server, you can use the following code samples to handle the payload data effectively.
#### PHP
```PHP theme={null}
$payload = @file_get_contents('php://input');
// ...
http_response_code(200);
```
#### go
```go theme={null}
package main
import (
"io/ioutil"
"net/http"
)
func main() {
http.HandleFunc("/webhook", func(w http.ResponseWriter, r *http.Request) {
// Read raw request body
payload, err := ioutil.ReadAll(r.Body)
if err != nil {
http.Error(w, "Failed to read body", http.StatusInternalServerError)
return
}
defer r.Body.Close()
// ... do something with payload
_ = payload // just like PHP comment placeholder
// Send 200 OK response
w.WriteHeader(http.StatusOK)
})
// Start server on port 4242
http.ListenAndServe(":4242", nil)
}
```
#### Python
```python theme={null}
from flask import Flask, jsonify, request
app = Flask(__name__)
@app.route('/webhook', methods=['POST'])
def webhook():
payload = request.data
# ...
return jsonify(success=True)
```
#### Node.js
```JavaScript theme={null}
const express = require('express');
const app = express();
app.post('/webhook', express.raw({type: 'application/json'}), (request, response) => {
const payload = request.body;
// ...
response.send();
});
app.listen(4242, () => console.log('Running on port 4242'));
```
# Secure Your Webhooks (Optional)
To receive Webhooks, you need a **publicly accessible URL** (the Webhook endpoint).
Be aware that this can be insecure, as anyone who knows the URL could trigger actions on your server.
BankStmtConverter provides a **unique Signing Secret** for each Webhook. Every Webhook payload is signed using this secret, and the signature is sent in the request header `BankStatementConverter-Signature`.
Verifying this signature ensures that the request is genuine and truly sent from BankStmtConverter.
## How to Verify the Signature
1. Use your **Signing Secret** to generate a signature for the received payload.
2. Compare your generated signature with the `BankStmtConverter-signature` header sent with the Webhook.
3. If both signatures match, the request is authentic and safe to process.
 #### Steps to Verify the Signature
* Generate a hash of the entire received payload using the HMAC SHA-256 algorithm with your Signing Secret as the key.
* Convert this hash into Base64 format.
* Compare your generated signature with the value received in the BankStmtConverter-signature header.
* If both values match, the Webhook is verified.
***
# Webhook Event Fields
#### Steps to Verify the Signature
* Generate a hash of the entire received payload using the HMAC SHA-256 algorithm with your Signing Secret as the key.
* Convert this hash into Base64 format.
* Compare your generated signature with the value received in the BankStmtConverter-signature header.
* If both values match, the Webhook is verified.
***
# Webhook Event Fields
 | Field Name | Value from your event | Meaning |
| -------------- | --------------------------------- | ------------------------------------------------------------------------------------------------------------------------------------------ |
| `event` | `"document.extracted"` | The core action: The document has been successfully processed and its content/metadata is now available. This triggers your system to act. |
| `document_id` | `"01k6mabs1npmhaedyc9hmc"` | A unique identifier for this specific document. Use this ID to fetch the extracted data (text, tables, etc.). |
| `name` | `"Bankstmtconverter-Pricing.pdf"` | The original filename of the document. |
| `size` | `15025` | The size of the document in bytes. |
| `pages` | `1` | The number of pages in the document. |
| `download_url` | `(A URL)` | A temporary link to download the original document or possibly the extracted data (e.g., CSV/JSON file). |
***
## Reference
> Follow the screenshot above for a visual guide.
1. Enter the **Name** & **Destination URL** provided by the third-party app where you want to send data.
| Field Name | Value from your event | Meaning |
| -------------- | --------------------------------- | ------------------------------------------------------------------------------------------------------------------------------------------ |
| `event` | `"document.extracted"` | The core action: The document has been successfully processed and its content/metadata is now available. This triggers your system to act. |
| `document_id` | `"01k6mabs1npmhaedyc9hmc"` | A unique identifier for this specific document. Use this ID to fetch the extracted data (text, tables, etc.). |
| `name` | `"Bankstmtconverter-Pricing.pdf"` | The original filename of the document. |
| `size` | `15025` | The size of the document in bytes. |
| `pages` | `1` | The number of pages in the document. |
| `download_url` | `(A URL)` | A temporary link to download the original document or possibly the extracted data (e.g., CSV/JSON file). |
***
## Reference
> Follow the screenshot above for a visual guide.
1. Enter the **Name** & **Destination URL** provided by the third-party app where you want to send data.
 2. Ensure the Webhook is **active**. You may see a status indicator like "Active" or "Enabled".
 4. Click Logs in the options menu to view your **Webhook Logs**.
 > Follow the video for a step-by-step guide.